Bring on the Bikram!
- Gloria Finnan

- Sep 12, 2019
- 7 min read
Updated: Sep 26, 2019
Today in my Yoga: East Meets West class, we had the amazing opportunity to experience Bikram Yoga with Diane Polli.
A little bit about Bikram Yoga is that it is a form of hot yoga. And when I mean hot... I mean SWEATY! Bikram classes are 90 minutes long and have a repeating sequence of 26 poses. Focusing on discipline and your stretching, the room is heated to 105 degrees. The room is heated to help with blood circulation all throughout your body. When focusing on your breathing, these poses help you open up your lungs inhaling fresh air.
Bikram's popularity boomed during the 70's. It originated in Calcutta during the 1960's by Bikram Choudhury...who was only four years old when he started practicing yoga in the 1940's! He created this sequence of 26 poses and even founded the Yoga College of India.
In class today, we did not do the hot part of the session and opened the windows for air to circulate (whew!)
The 26 Poses of Bikram Yoga
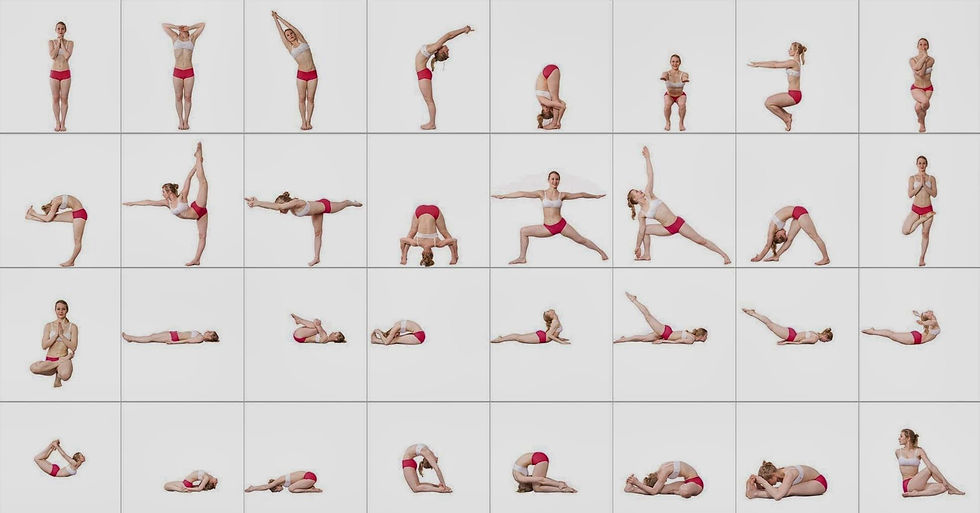
For individual pictures and detailed descriptions of each pose, visit this link! https://www.doyouyoga.com/the-26-poses-of-bikram-yoga-64644/
1. Standing Deep Breathing: Pranaya
This first pose has you start similarly to mountain pose. You stand tall at the top of your mat and clasp your hands together with you fingers intertwined with each other. Your hands are directly under your chin, touching it. You take a deep breath in and when you exhale, you open you hands up (fingers still intertwined) with your arms bent, but stretched while your elbows go behind your head.
2. Half Moon Pose
Standing tall and feet together, clasp your hands straight above your head with you index fingers pointing up. Lean to the right with your hips going to the left. Do the same to the right and do the same leaning back creating Crescent pose. Repeat this twice.
3. Chair Pose
I have a love hate relationship with this pose. I love the strength build up, but it comes with lots of pain. Standing tall with feet, heels, and knees together, put your arms straight out and bend your knees so you are taking the form of a chair. bend down are far as you can, keeping your back straight, or until your butt reaches your heels and lift your heels off the floor. Repeat all poses twice.
4. Eagle Pose (one of my favorites)
Wrap your right leg around your left. Try to hook it around your left if you can. Do the same with your right arm over the left, interlocking hands when they meet. Your left leg should be the only leg on the mat and bend your leg keeping your back straight and hold it. Do the same with your left leg and arm.
5. Standing-Head-to-Knee Pose
Balancing on your left leg, keeping it straight, bend your right leg into your hands and slowly stretch it out forward making a 90 degree angle with your legs. Keep your right foot in your hands and try to touch your head to your right knee. Now do it with your left leg.
6. Standing Bow-Pulling Pose (similar to Dancer's Pose)
Balancing on your left leg, use your right arm to grab your right foot behind you (grab from the inside of the foot). Kick back with your left arm straight out in front of you. Your body should look like a bow and arrow. Repeat with the other leg.
7. Balancing Stick Pose
Similar to the previous pose, with your right leg on the floor and left leg behind you making a 90 degree angle with the right leg, put your arms straight forward with your head in between both elbows. Your body should be making the shape of a capital T. Repeat with other leg.
8. Standing Separate Leg Strentching Pose
Standing sideways on the mat facing the wall, keep your feet apart and your legs straight. Keep your hips facing forward and bend down to the left. having your forehead or nose touch your let knee. Do the same to the right. Then bend forward trying to have the top of your head touch the floor and your hands are at each foot.
9. Triangle Pose
The previous pose is a great transition to this. With your legs apart, have your right foot face forward and your left foot pointing to the left. Your feet should be perpendicular. bend you left knee and stretch your back so you left hand touches either your ankle or floor and your right hand is stretching up to the sky. Do the same on your right side
10. Standing Separate Leg Head-to-Knee Pose
Just like triangle pose, but your hips and feet face to the right and you bend down to touch your right toes and your forehead or nose touches your knee. Do the same to the left.
11. Tree Pose (another favorite)
Stand tall with your right leg bent so your right foot touches your thigh. Stand in prayer or alf prayer if you need to hold your foot. Do the same on the other leg.
12. Toe Stand
From Tree Pose, try to bend your left leg to the point where your right foot is still bent but is resting on your left thigh and lift your left heel off the ground. Do the same with the other leg.
13. Corpse Pose (another favorite)
Lay on your back with your feet apart, totally relaxed. Have your arms at your sides and your palms facing the sky.
14. Wind Removing Pose
From Corpse Pose, bend your legs to your chest and wrap your arms around them, holding your elbows. To stretch before this pose, start with bending one leg and stretching it outside of your rib cage toward your shoulder. Do the same to the opposite leg.
15. Sit Up
From Corpse Pose, stretch your arms above your head with your head in between your arms and in an inhale, sit up and exhale folding forward so your hands touch your toes and your forehead or nose touches your knees. We did the pose several times to rest and transition throughout the sequence.
16. Cobra Pose
Our pose today was a little different than Cobra Pose. It is the same with laying on your stomach and lifting your chest off the floor, but without the work of your arms. This is a back building pose.
17. Locust Pose
Just like our different version of Cobra, lift your left leg, then left with your chest, then just your right leg. then your right leg with your chest.
18. Full Locust Pose
This is the same pose as the previous one, but with just lifting your legs and then lifting them with your chest. We did both Locust and Full Locust with your arms and elbows underneath our bodies.
19. Bow Pose
Just like Full Locust Pose, lay on your stomach and lift both legs off the floor. Have your chest up as well and reach your arms back behind you holding your ankles.
20. Fixed Firm Pose
Sitting with your knees facing forward and your butt in between your feet so your feet are on the outside of your body, lean back and try to put your hands on your heels. from there, try to lay your forearms back with your hands on your heels and your elbows facing directly behind you. Don't forget to bring your head back as well. The stretch your arms back above your head and try to lay on your back.
21. Half Tortoise Pose (or Child's Pose another favorite)
Sitting with your knees facing front and your button on your heels, bend forward to have your forehead touch the floor and your arms stretched above your head with your finger tips touching the floor. This is very relaxing.
22. Camel Pose
Standing on your knees, lean back and have your hands touch your feet and lean your head back. Your body should be making the shape of a rectangle.
23. Rabbit Pose (I can't remember if we did this in class, but it was mentioned)
Standing on your knees, fold over so the top of your head touches the floor and your face touches your thighs. Stretch your arms out forward grabbing or touching your heels.
24. Head-to-Knee Pose and Stretching Pose
Time to start stretching it out! Sit with your legs straight in front of your and fold over to touch your toes. Touch your face to your knees if you van. Then bend your right leg so your right foot is touching your inner though and going parallel to it and fold forward touching your right foot and having your face touch your right knee. Do the same to the left.
25. Spine Twisting Pose
Sit up straight with your right leg bent as if you are sitting criss-cross apple sauce. Bend your left leg over the right. Stretch your left arm behind you, touching your back right waist. Have your right arm stretching forward where you can touch your left knee with your hand. Look to the left. Do the same to the other side.
This was very hard to explain so here is a picture for reference.

26. Blowing in Firm
Sit up straight with your butt on your calves and knees facing forward.
You did it!
I felt very relaxed doing this sequence. It's comfortable learning new yoga poses with people around you learning it as well. Since we were all new to Bikram, we didn't try to go ahead of anyone or tried to show off. Everyone has their own pace and level of flexibility. It was nice hearing from Diane this it's okay if you can't do all 26 poses. Sometimes you'll stretch enough, build enough strength, or build enough balance to get certain poses right. Sometimes you won't be able to achieve certain poses and that's alright. Not everyone can do every single pose. I am very thankful we did not do this in 105 degrees. One step at a time!
I was very eager to participate in a Bikram sequence. In high school, I always signed up for the yoga unit in gym class. The most common sequence we did in class was Surya Namaskar, or Sun Salutations. I loved how it honored the sun and warmed me up for the day. I used to do Sun Saluatations every day, but when starting college, I began to lose track of time. Now, I plan to continue doing daily Sun Salutations along with my weekly yoga classes to bring positive energy throughout my day. I also plan to memorize the Bikram Sequence to practice weekly on my own to build my strength.


Comments